App Modernization - Part #3: Migrate ASCX components
Published: 10/12/2023 4:04:48 PMThis article is the third part of the series:
- App Modernization - Part #1: Migrate Web Forms code islands to DotVVM
- App Modernization - Part #2: Migrate underscore.js templates and JQuery data loading
- App Modernization - Part #3: Migrate ASCX components
- App Modernization - Part #4: Migrate ASCX components
In this example, we will return to our fictional customer internal e-shop pages written in ASP.NET Web Forms. This article is the first of two articles migrating the ProductDetail page.
In this article we will explore how to migrate ASP.NET WebForms ASCX controls into DotVVM. We will discuss the differences and challenges that need to be taken into account.
You can follow this this migration by cloning the sample repo.
Differences between ASP.NET WebForms and DotVVM controls
To understand how to successfully migrate ASCX controls we need to take a closer look at the structure of ASCX controls in contrast with DotVVM controls. Unlike Web Forms pages, where most of the markup and functionality has direct equivalent, DotVVM controls and ASCX controls have many differences. DotVVM controls are designed to operate on the client side using a combination of Knockout JS bindings and DotVVM JavaScript API.
Web Forms controls
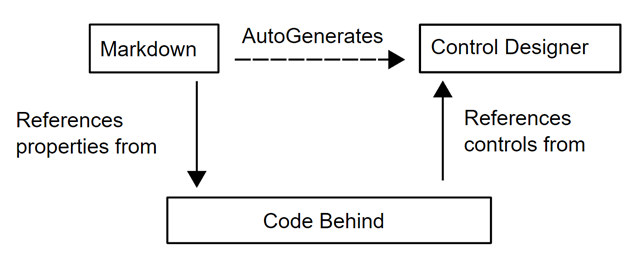
ASPX controls usually consist of 3 files. One auto-generated designer file, one ASCX markup file, and one code-behind C# file. It is common to put the control logic in the C# code-behind and also to represent state in the viewstate of the control.

The control properties are usually defined in C# as public properties on the code-behind class. The properties are evaluated on the server side only.
The property values are stored as part of the viewstate field and are transferred during the post-back from client side to server side.
DotVVM controls
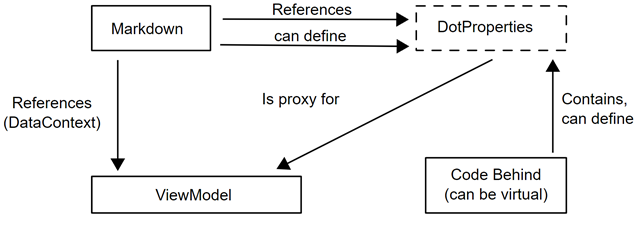
DotVVM Markup controls are usually defined in .dotcontrol markup file. Optionally, the markup control can have a code-behind file with properties and additional rendering logic. In some cases we need to represent the control state, or the control has some validation logic. In such cases, we recommend creating a special viewmodel for the control. The viewmodel then holds all the data specific to the control and may contain any business logic.

We refer to properties of DotVVM controls as DotProperties. DotProperties serve as proxies for the viewmodel data. The viewmodel data are bound to the DotProperties in the DotVVM page or another control from where the control is referenced. The properties must work both on the server side and on the client side.
On the server side, the DotProperties are evaluated using the data from the viewmodel that have been initialized on the first page load, or transferred from the client during page the post-back.
On the client side, the DotProperty value is represented as a Knockout JS computed observable which can be used in data-binding expressions. When the underlying data in the viewmodel property change, the DotProperty value also changes thanks to the Knockout JS notification system in the observables.
Using DotProperties
From DotVVM 4 onwards, it is possible to define DotProperty directly in the markup using @property directive. No code-behind class is needed.
@property bool UseHeader = trueThere are some pitfalls to be aware of when using DotVVM controls and DotProperties:
- Simple C# public properties on markup control code-behind will not work as DotProperties and should be avoided.
- During the post-back, the DotProperty values are loaded in the
Loadstage. If you try to access them earlier (e. g. in theInitphase), the values will not be loaded yet. - DotProperties are just proxies for the viewmodel and can not store their values. Therefore, DotProperties of primitive types cannot be assigned to.
- When DotProperties are bound to a complex object, we can set the properties of that object.
Migrating a simple control
Now we have the theory out of the way, we can start migrating some controls.
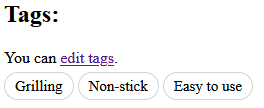
As a part of our ProductDetail page, we have a list of tags. The list is provided to the control as a property from the parent page. We can also optionally set the AllowEditing property and whether a link to the tag edit page is shown.

The parent page has the responsibility of loading and filling the data. Parent page also calls the DataBind for the control.
We can take a look at the code-behind ProductTags.aspx.cs
public partial class ProductTags : System.Web.UI.UserControl
{
    public List<Tag> Tags { get; set; }
    public bool AllowEditing { get; set; }

    public override void DataBind()
    {
        TagRepeater.DataSource = Tags;
        TagRepeater.DataBind();

        if (AllowEditing)
        {
            AddTagPanel.Visible = true;
        }

        base.DataBind();
    }

    //...
}
The markup is just one Repeater control with the link that is shown based on the specified condition.
<%@ Control Language="C#" AutoEventWireup="true" CodeBehind="ProductTags.ascx.cs" Inherits="DotVVM.Samples.Controls.ProductTags" %>

<div class="product-tags">
    <div id="EditTagPanel" runat="server" visible="false">
        You can <a href="EditTags.aspx?productId=<%=ProductId %>">edit tags</a>.
    </div>
    <asp:Repeater ID="TagRepeater" runat="server">
        <ItemTemplate>
            <span class="product-tag"><%# Eval("Name") %></span>
        </ItemTemplate>
    </asp:Repeater>
</div>
With such a simple control, we do not need a viewmodel. We can rely on DotProperties that we can define in the .dotcontrol markup file.
We can see in the .aspx.cs file are 2 properties that are set from parent page:
public List<Tag> Tags { get; set; }
public bool AllowEditing { get; set; }
On top of that, we can see that the link uses the ProductId property to pass into the query string. With this information, we can create the new markup control ProductTags.dotcontrol and define its properties in the control markup:
@import System.Collections.Generic
@import DotVVM.Samples.Model

@viewModel object

@property List<Tag> Tags
@property bool AllowEditing
@property int ProductId
Notice that we used @import directive to import namespaces for List and Tag. Also we don't need any viewmodel for this control so we can use object. It declares that the control must be used in a data context that inherits from System.Object (which is true for any type in .NET).
Now the properties can be set in the parent page ProductDetail like this:
<cc:ProductTags Tags={value: Tags} AllowEditing="true" ProductId={value: ProductId} />We must not forget that DotVVM control properties are only proxies. They just contain whatever viewmodel data we bind to them. We need to create the Tags and ProductId properties in the viewmodel of our parent page to hold the data for us.
We add the property to ProductDetailViewModel.cs:
public class ProductDetailViewModel : SiteViewModel{
    //...
    public int ProductId { get; set; }
    public List<Tag> Tags { get; set; }
    //...
}
We continue by migrating the Repeater control. First, let's remind ourselves of the BindData function of the original ASPX control code behind:
TagRepeater.DataSource = Tags;
TagRepeater.DataBind();
Instead of setting the data source in the code, in DotVVM we use the DataSource binding in the markup to bind the Tags control property. No need to call any DataBind method - the data will be updated automatically. Since we are referencing DotProperty and not a viewmodel property, we have to add _control keyword. The _control keyword represents the markup control object on which our DotProperties are defined.
<div class="product-tags">
    <dot:Repeater ID="TagRepeater" DataSource={value: _control.Tags}>
        <span class="product-tag" InnerText={value: Name} />
    </dot:Repeater>
    <!-- ... -->
</div>
Next, we can move to migrating the link. We can use DotVVM control RouteLink. The advantage of using the control instead of just a tag is we have validation of the route name and its parameters.
Before migrating the link, we should create and register the TagEdit page just to be able to reference the route in the link.
<div id="EditTagPanel" runat="server" visible="false">
    You can <a href="EditTags.aspx?productId=<%=ProductId %>">edit tags</a>.
</div>
The link references EditTags.aspx page so in DotVVM we are going to have the route registered as EditTags. Next we can see ProductId is used as a query parameter in the link. For query parameters we can use Query- property group of RouteLink.
We should also address the conditional hiding of the edit link. In the ProductTags.ascx we can see following piece of code:
if (AllowEditing)
{
    EditTagPanel.Visible = true;
}
In the markup, we can see the div has attributes runat="server" visible="false" which tells us that it is hidden by default. For hiding parts of the page on server side that should not be rendered on client if some condition is not met we can use IncludeInPage attribute in combination with resource binding. This approach useful for conditions like privilege checks because the hidden element is not rendered on client side at all and cannot be shown using JavaScript. Of course, multiple layers of checks are advised.
Putting it all to gether we get following migrated markup:
<div id="EditTagPanel" IncludeInPage={resource: _control.AllowEditing}>
    You can
    <dot:RouteLink RouteName="EditTags"
                   Text="edit tags"
                   Query-productId={value: _control.ProductId} />.
</div>
Now we have the ProductTags control migrated, We need to register it in the DotvvmStartup.RegisterControls method. This is so that we can reference it in the DotVVM markup.
config.Markup.AddMarkupControl("cc", "ProductTags", "Migrated/Controls/ProductTags.dotcontrol");Loading the data
We have already referenced the ProductTags in the ProductDetail markup. We have also created the ProductId and Tags properties in ProductDetailViewModel. Now we have to migrate the logic of the product detail page that fills the properties. We can take a look at the Page_Load method in the ProductDetail.aspx.cs code-behind:
protected void Page_Load(object sender, EventArgs e)
{
    var context = HttpContext.Current;

    _productId = context.GetIntQuery($"productId");

    if (_productId == 0)
    {
        Message = "Invalid product ID";
        return;
    }

    Tags = _facade.GetTags(_productId);
    //...

    BindData();
}
We can copy the content of the method into the ProductDetailViewModel.Load() method and start dealing with inconsistencies.
For the logic filling the _productId from query the solution is quite simple. We already have our viewmodel property ProductId. Instead of _productId we use our viewmodel property ProductId.
The ID of the current product is taken from the query string. DotVVM can automatically fill the value from query string into the viewmodel property. We have to use [FromQuery("productId")]. Just like that, the ProductId will be filled with the correct value. We do not need to get the value from the HttpContext ourselves.
We have to keep the validation message. We create Message property as a new string property in the viewmodel. The Message has private setter because we intend to only send save messages from server to client, not from client back to server.
We need to create a private readonly field _facade in ProductDetailViewModel. For this article, we will create the facade instance in the constructor like so:
public ProductDetail()
{
    _facade = new ProductDetailFacade();
}
If the project used dependency injection, we would be able to inject the _facade using a constructor parameter.
The last thing to take a look at, is the BindData method. In original ASPX page, the properties of the ProductTagsControl were set, and ProductTagsControl.DataBind() was called. We do not need any of that code; in DotVVM we are using data bindings in the page markup instead. There is also a code for data-binding another control, but we will deal with the control in the next article. We can safely delete the DataBind method call.
The migrated Load() method looks like this:
public override Task Load()
{
    if (ProductId == 0)
    {
        Message = "Invalid product ID";
        return base.Load();
    }

    Tags = _facade.GetTags(ProductId);

    return base.Load();
}
Now the ProductTags control should be migrated connected and functioning.
Conclusion
In this article, we have explored some differences between ASP.NET Web Forms controls and DotVVM control. We explored the concept of DotProperties and contrasted them to Web Forms control properties. We migrated a simple ProductTags ASCX control into DotVVM control and we used markup-defined DotProperties. As a result, we ended up with less code and better maintainability.
In the next article, we will explore migrating more complicated control that we may encounter in the wild.

I am Software Engineer at RIGANTI. I participate in the development of the DotVVM Framework, and I take care of the DotVVM for Visual Studio extension. I was also involved in several projects where DotVVM was used to modernize ASP.NET Web Forms applications.